Does Converting JPG to PNG Improve Quality? A 10-Save Test
It is one of the most common questions about image conversion, and the honest answer has two halves:
- No, converting a JPG to PNG does not improve its quality. Detail that JPG compression removed is gone, and PNG has no way to know what it was.
- Yes, it can protect quality from here on. Every time a JPG is edited and saved again, it is compressed again and loses a little more. A PNG can be edited and saved any number of times without any loss.
So the useful question is not “does PNG make my image better?” but “will this image be edited again?” If it will, a PNG working copy is worth it. This guide shows what that difference looks like in numbers.
Why conversion cannot restore detail
When a JPG is saved, its encoder rounds away fine detail in each 8×8 block of pixels and stores colour at reduced resolution. When you open the JPG, the decoder rebuilds the pixels from what was kept. Those rebuilt pixels are the only information that exists.
Converting to PNG copies those rebuilt pixels into a lossless file, one for one. The PNG is a perfect record of the JPG as it looks now, including any blockiness, colour smearing or ringing around edges. You can confirm this with any image comparison tool: the decoded JPG and the PNG are pixel-for-pixel identical.
Tools that claim to “enhance” or “upscale” images work differently: they invent plausible detail, usually with machine learning. That can look impressive, but it is a guess, not a recovery, and it is a separate step from changing the file format.
What PNG does protect: generation loss
“Generation loss” is the quality drop that accumulates when a lossy file is decoded, changed and re-encoded repeatedly. It happens with JPG because each save runs the lossy compression again on pixels that have shifted slightly since the last save. Crop by a pixel, rotate, adjust brightness, add a caption: the 8×8 blocks no longer line up with the previous ones, and the encoder throws away a new batch of detail.
Our test
We took two images, a 1080p photo and a 1080p app screenshot with small grey text, and ran the same “light edit” ten times on two copies of each:
- JPG chain: crop one pixel from the left edge, pad it back, save as JPG at quality 85 (a common default), reopen, repeat.
- PNG chain: exactly the same edit, saved as PNG each time.
After each round we compared the JPG chain with the PNG chain. Since both received identical edits, any difference between them is caused purely by repeated JPG compression. We measured that difference as PSNR (peak signal-to-noise ratio, in decibels; higher means closer, and anything above about 45 dB is generally invisible).
Results
| Saves | Photo: JPG vs lossless | Screenshot: JPG vs lossless |
|---|---|---|
| 1 | 48.1 dB | 42.2 dB |
| 3 | 45.1 dB | 37.9 dB |
| 5 | 43.9 dB | 36.1 dB |
| 10 | 42.9 dB | 34.0 dB |
The PNG chain, by definition, lost nothing: after ten saves it was identical to the original with ten edits applied.
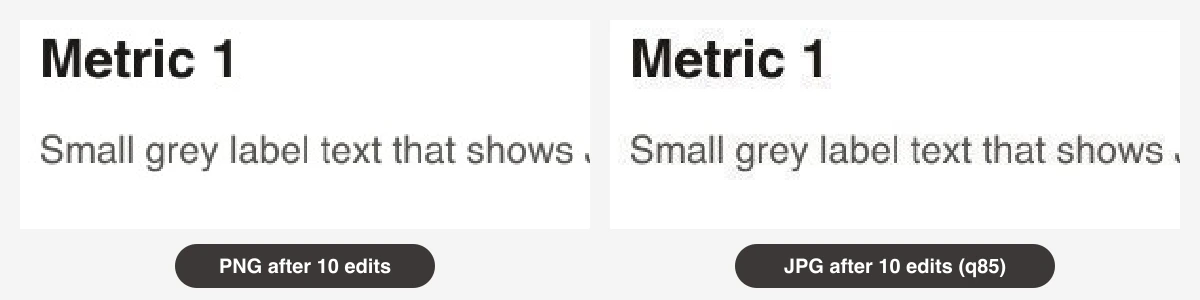
Zoomed crop from the screenshot after ten edit-and-save rounds. Left: PNG chain. Right: JPG chain at quality 85. Look at the edges of the letters and the space between them.
What the numbers mean
- Photos tolerate a few re-saves well. After one save, the photo was still at 48 dB, essentially invisible. After ten, at 43 dB, differences start to appear on close inspection, mostly in fine texture.
- Screenshots and text degrade fast. The screenshot dropped below 40 dB after only three saves. Text and flat colour are JPG’s weak spot, and each save adds a new layer of ringing around the letters.
- The loss is cumulative. It never recovers. Even the best editing after that point is working on a slightly worse image.
When converting to PNG is the right call
- You are about to edit an image several times, for example a design you will tweak over days, or a screenshot you will annotate, crop and resize. Convert once at the start, work on the PNG, and export a final JPG only when you are done if you need a small file.
- The image contains text, lines or flat graphics and will be re-saved even once or twice.
- You need a transparent background. JPG cannot store transparency at all; see How to make a JPG transparent.
- Software or a website requires PNG.
When it isn’t worth it
- A photo you only want to view or share. Converting makes the file 6–10× larger and changes nothing you can see. See why PNG files are bigger.
- Uploading to social media. Most platforms re-compress uploads to JPG or WebP, so a PNG upload gets converted back anyway.
- Hoping to fix a blurry or blocky JPG. The PNG will look exactly as blurry and blocky.
A practical workflow
- Keep the original JPG from your camera or source untouched.
- Convert it to PNG before you start editing. Our converter does this in your browser without uploading, and applies the photo’s rotation so it stays upright.
- Do all your edits on the PNG, saving as often as you like.
- When you’re finished, export to whatever the destination needs: JPG for photos to share, PNG for graphics and transparency, WebP for your website.
This is the same “lossless intermediate” approach professional photo and video editors use: decode once, work losslessly, compress once at the end.
How we tested
Images were processed with sharp (libvips). The “edit” was extract one pixel from the left followed by extend with edge copy, applied identically to both chains. JPG chains were encoded with libjpeg-turbo (sharp’s default encoder) at quality 85 with its default 4:2:0 chroma subsampling. PSNR was computed over all RGB values between the two chains at each checkpoint. The source photo was a 4K aerial landscape resized to 1920×1080; the screenshot was a synthetic dashboard with 20-pixel grey label text.