How to Make a JPG Transparent (Remove a White Background)
You have a logo, a signature or a product photo as a JPG with a white background, and you want to place it on a coloured slide or website without the white box around it. The fix is not a setting inside the JPG: you need to remove the background and save the result in a format that can store transparency, usually PNG.
Why a JPG can’t be transparent
Every digital image is a grid of pixels, and each pixel stores colour values. Most formats store three: red, green and blue. Formats that support transparency store a fourth value per pixel, called alpha, that says how opaque that pixel is, from 0 (fully see-through) to 255 (fully solid).
| Format | Alpha channel | Notes |
|---|---|---|
| JPG / JPEG | No | Every pixel is fully opaque |
| PNG | Yes, 8 or 16 bits | Smooth, partial transparency; universally supported |
| GIF | 1 bit only | A pixel is either fully transparent or fully solid; jagged edges |
| WebP | Yes, 8 bits | Smaller files; very good modern support |
| AVIF | Yes | Smallest files; newest format |
JPG was designed in the early 1990s for photographs, which have no need for transparency, and the format has no place to put an alpha value. That is why “save as JPG” in any editor flattens transparent areas onto a solid colour, usually white or black, and why a white-background JPG will always show its white box.
So making a JPG “transparent” always means two steps: decide which pixels are background, and save to a format with an alpha channel.
What “transparent” really looks like
Image editors show transparent pixels as a grey-and-white checkerboard. That pattern is not part of the image; it is just how software visualises “nothing here”. If you download a “transparent PNG” from a website and the checkerboard shows up in your document, the checkerboard was painted into the pixels and the file isn’t actually transparent.
Good transparent images also use partial transparency at their edges. A round logo’s outline passes diagonally through pixels, so the edge pixels are part logo and part background. A well-made transparent PNG gives those pixels alpha values between 0 and 255, so the edge blends smoothly with whatever is behind it.
Method 1: Remove a solid background by colour (fastest)
If the background is a single flat colour (most logos, scanned signatures, icons, studio product shots), you can remove it by colour. This is what our JPG to transparent PNG tool does, in your browser:
- It finds the background colour, by default by sampling the image corners.
- It removes pixels close to that colour, within a tolerance you control.
- It fades out pixels just beyond the tolerance, so edges stay smooth.
- It saves the result as PNG.
The most important choice is whether to remove matching colour everywhere or only where it touches the edges of the image:
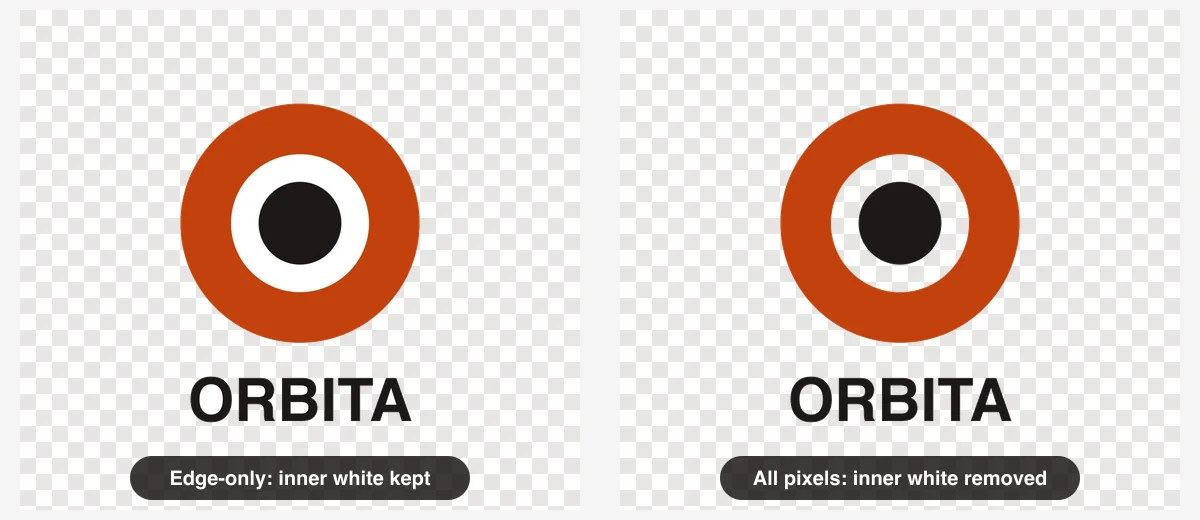
Edge-only mode (left) starts at the border and stops at the subject, so white areas enclosed by the logo survive. All-pixels mode (right) removes every white pixel, including the ring inside the logo. In our test, that was the difference between 75.8% and 80.8% of the image becoming transparent.
Edge-only is usually what you want for logos, faces and text with white details. All-pixels is useful when the background shows through holes in the subject, such as the inside of the letters “O”, “A” and “B” in a word mark, or the gaps in a chain-link fence.
Choosing the tolerance
- 0–10: removes only near-exact background colour. Good for clean digital graphics.
- 10–25: the sweet spot for most JPGs, whose compression makes the background slightly uneven.
- 25–40: for photographed or scanned images with uneven lighting, and for removing faint shadows.
- Above 40: risky; light parts of the subject start to disappear.
In our tests on a clean logo, moving the tolerance from 3 to 30 changed the removed area by only 0.3 percentage points. On a product photo with a soft shadow, the same change removed 4.6 points more of the image, mostly the faint outer shadow. Tolerance matters most when the background is not perfectly flat.
Method 2: Use an image editor
Desktop editors give you more control at the cost of time:
- Photoshop / Photopea (free, in browser): use the Magic Wand with “Contiguous” ticked (the same idea as edge-only mode), press Delete, then File → Export As → PNG.
- GIMP (free): add an alpha channel (Layer → Transparency → Add Alpha Channel), use Colors → Color to Alpha to turn white into transparency, then export as PNG.
- Microsoft PowerPoint / Word: select the picture, then Picture Format → Color → Set Transparent Color and click the background. This only removes one exact colour and works best on clean graphics; right-click → Save as Picture → PNG to export.
- Apple Preview (Mac): Tools → Instant Alpha, drag over the background, then File → Export → PNG.
Method 3: AI background removal (for complex photos)
If the background is busy, such as a person in a room or a product on a textured table, colour-based removal will not work, because the background has many colours and the subject shares some of them. AI tools that recognise subjects (remove.bg, Photoshop’s “Remove Background”, Apple’s “Lift subject from background” on iPhone and Mac, Canva’s background remover) are the right choice here. Most of them can export PNG directly; if yours exports something else, you can convert it afterwards.
Tips for the best result
- Start with the largest, cleanest JPG you have. Heavily compressed JPGs have blotchy backgrounds that need a high tolerance.
- Photograph signatures in daylight on plain white paper, holding the phone parallel to the page to avoid shadows. Crop close before converting.
- Check the PNG on the colour you will use it on. A faint light fringe can be invisible on white but obvious on a dark background. If you see one, raise the tolerance a little.
- Keep the PNG as your master copy. Re-saving as JPG would bring the white background straight back, because JPG cannot store transparency.
Frequently confused: transparent vs white
A PNG with a white background is not transparent. If you convert a JPG to PNG without removing the background, the white is still there, just stored losslessly. Only pixels with an alpha value below 255 are see-through. Our converter shows transparent areas on a checkerboard in the preview so you can tell immediately.
Ready to try it? Open JPG to transparent PNG, drop your image in, and adjust the tolerance until the edges look clean. Nothing is uploaded; the whole process runs on your device.